Excel Page Setup
MARGINS
Margins are the blank areas along the sides, top, and bottom of a printed page. All printed pages in MS Excel have the same margins and it can’t define separate margins for different pages.
You can set margins with various ways as below
- Choose Page Layout>> Click on Margins drop-down list from page setup group, you can select predefined options (Normal, Wide, Narrow) and can also select Custom Margins.
CUSTOM MARGINS
When you click on custom Margins option from Margin button drop down list, the Page setup dialog box will appear with select Margins tab as illustrated right.
There are various options available for custom settings like:
- Set the Left, Right, Top & button blank area size by increasing or decreasing spinner button.
- Select Header and Footer Size.
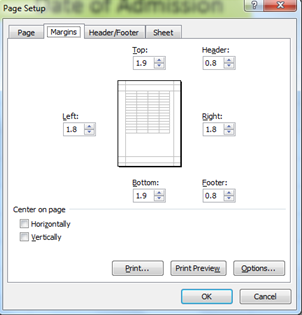
- You can set the document at the center of page margins like vertically or horizontally. Select the appropriate check box in the Center on Page section of the Margins tab as shown in above page setup dialog box.
HEADER AND FOOTER
A header is information that appears at the top of each printed page and a footer is information that appears at the bottom of each printed page. By default, new workbooks do not have headers or footers.
ADDING HEADER AND FOOTER
- Choose Page Setup dialog box by click on Page Setup Launcher button>>Header or Footer tab.
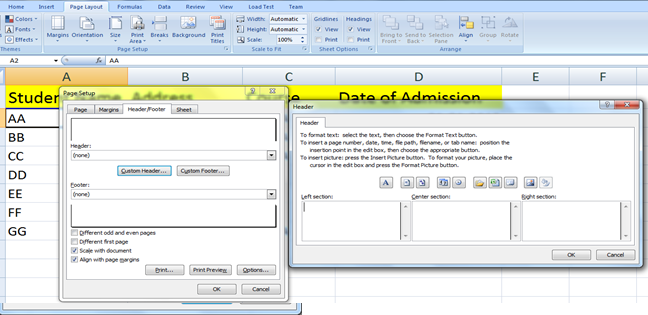
You can choose predefined header and footer like Page number, Current Date, Current time, Book Name, Sheet’s Name, Picture etc. or also can add your text into header and footer area by using the option Custom Header and Custom Footer button.
PAGE BREAKS
If you don’t want a row to print on a page by itself or you don’t want a table header row to be the last line on a page. MS Excel gives you precise control over page breaks. MS Excel handles page breaks automatically, but sometimes you may want to force a page break either a vertical or a horizontal one so that the report prints the way you want. For example, if your worksheet consists of several distinct sections, you may want to print each section on a separate sheet of paper.
INSERTING PAGE BREAKS
Insert Horizontal Page Break: For example, if you want row 10 to be the first row of a new page, select cell A10. Then choose Page Layout>>Breaks>>Insert Page Break.
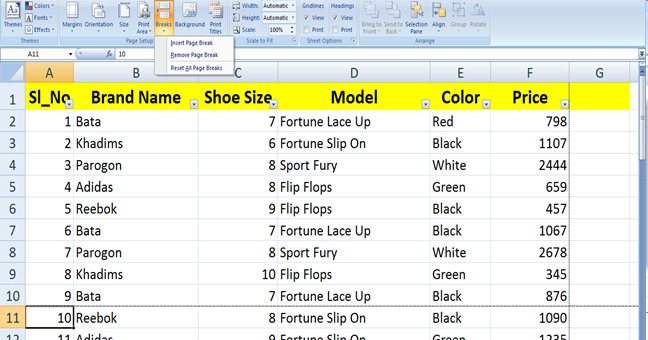
Insert Vertical Page break:
In this case make sure to place the pointer in row 1 of particular column in which left you want to insert column break like C1. Choose Page Layout>>Breaks>>Insert Page Break to create the page break.
REMOVING PAGE BREAKS
- Remove a page break you’ve added: Move the cell pointer to the first row beneath of the manual page break and then choose Page Layout>> Breaks>>Remove Page Break
- Remove all manual page breaks: Choose Page Layout >> Breaks >> Reset All Page Breaks.
PAGE ORIENTATION
Page orientation refers to how output is printed on the page. If you change the orientation, the onscreen page breaks adjust automatically to accommodate the new paper orientation.
Types of Page Orientation
- Portrait: Portrait print tall pages (the default)
- Landscape: Landscape to print wide pages. Landscape orientation is useful when you have a wide range that doesn’t fit on a vertically oriented page.
Choose Page Layout>>Page Setup>>Orientation>>Portrait or Landscape
SHEET OPTIONS
MS Excel provides various sheet options for printing purpose like generally cell gridlines aren’t printed. If you want your printout to include the gridlines, Choose Page Layout>>Sheet Options group>>Gridlines>>Check Print
Options in Sheet options Dialogue
- Print Area: You can set print area with this option.
- Print Titles: You can set titles to appear at the top for rows and at the left for columns.
- Print:
- Gridlines: Gridlines to appear while printing worksheet.
- Black & White: Select this check box to have your color printer print the chart in black and white.
- Draft quality: Select this check box to print the chart using your printer’s draft-quality setting.
- Rows & Column Heading: Select this check box to have rows and column heading to print.
- Page Order:
- Down, then Over: It prints the down pages first and then right pages.
- Over, then Down: It prints right pages first and then come to print down pages.
BACKGROUND IMAGE
Page Layout >> Background command This button displays a dialogue box that lets you select an image to display as a background. Background images placed on a worksheet are never printed.